How To Setup a New User in QuickBooks
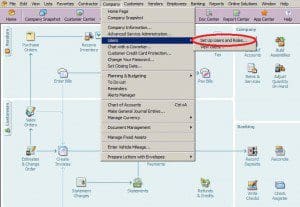
Here’s a quick guide on setting up new users within QuickBooks. It’s really easy to do and even easier if you already have users setup. First, open QuickBooks and log in with your admin account credentials, if you are not sure what your admin password is either ask your accounting person or contact QuickBooks for a password retrieval. Keep in mind that your Admin account is the bets and sometimes the only account with access to change and create user accounts. Once you are logged in, on the top bar, click Company>Users> Setup Users and Roles.
At this point you may be prompted for an admin password verification. Type in your password and hit OK. A Users and Roles list should now pop up. Here, you can add new users, duplicate users and edit them as well. For established QuickBooks setup with users, I always tell my clients to duplicate your users. Perhaps you have multiple people invoicing or creating purchase orders. These people should all have access to the same data and nothing more. In the case where you are hiring another sales or accounting person, there’s no need to create a new user, simply duplicate the old user, change the name for the new user and the password. This will save you time trying to figure out what access the other accounting person has and duplicating it. With the duplication option, this is done automatically.
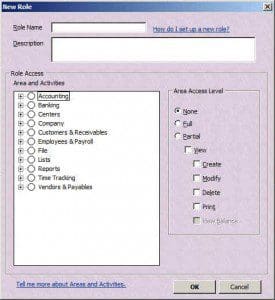
When adding a new user to your setup, we always tell our clients to know exactly what kind of access to give their new user, and if they are unsure of the access, call us or QuickBooks support. Custom roles are essential to an organized QuickBooks setup and it gives all the explanations to the manager that is setting up the new users. Under the users and Roles window, there is a Role List tab. Click that to see the Role List, to edit or create a new Role, click Edit, or New. Here, you can create a new role with specified access very easily. Each Area and Activity is available for you to give or remove access. Once your role is created, give it a name, go to your users, and give the role to your user. That user now has the attributes within that role you just set. It’s a multi-step process but it’s considered the backbone of security within QuickBooks. It’s very important to know which users see what within QuickBooks.